> ## Documentation Index
> Fetch the complete documentation index at: https://dripart-chore-sync-comfy-api-v2-spec-d5155ac.mintlify.site/llms.txt
> Use this file to discover all available pages before exploring further.
# ComfyUI Wan2.1 VACE Video Examples
> This article introduces how to complete Wan VACE video generation examples in ComfyUI
As we have made adjustments to the template and added related usage and instructions for CausVid LoRA, this document needs to be updated and requires some preparation time. Until then, please refer to the notes in the template for usage.
## About VACE
VACE 14B is an open-source unified video editing model launched by the Alibaba Tongyi Wanxiang team. Through integrating multi-task capabilities, supporting high-resolution processing and flexible multi-modal input mechanisms, this model significantly improves the efficiency and quality of video creation.
The model is open-sourced under the [Apache-2.0](https://github.com/ali-vilab/VACE?tab=Apache-2.0-1-ov-file) license and can be used for personal or commercial purposes.
Here is a comprehensive analysis of its core features and technical highlights:
* Multi-modal input: supports multiple input forms including text, images, video, masks, and control signals
* Unified architecture: single model supports multiple tasks with freely combinable functions
* Motion transfer: generates coherent actions based on reference videos
* Local replacement: replaces specific areas in videos through masks
* Video extension: completes actions or extends backgrounds
* Background replacement: preserves subjects while changing environmental backgrounds
Currently VACE has released two versions: 1.3B and 14B. Compared to the 1.3B version, the 14B version supports 720P resolution output with better image details and stability.
| Model | 480P | 720P |
| ----------------------------------------------------------- | ---- | ---- |
| [VACE-1.3B](https://huggingface.co/Wan-AI/Wan2.1-VACE-1.3B) | ✅ | ❌ |
| [VACE-14B](https://huggingface.co/Wan-AI/Wan2.1-VACE-14B) | ✅ | ✅ |
Related model weights and code repositories:
1.3B model weights on Hugging Face
14B model weights on Hugging Face
VACE source code and documentation
Official project homepage with examples
Make sure your ComfyUI is updated.
* [Download ComfyUI](https://www.comfy.org/download)
* [Update Guide](/installation/update_comfyui)
Workflows in this guide can be found in the [Workflow Templates](/interface/features/template).
If you can't find them in the template, your ComfyUI may be outdated.
If nodes are missing when loading a workflow, possible reasons:
1. You are not using the latest ComfyUI version (Nightly version)
2. Some nodes failed to import at startup
* [Cloud](https://cloud.comfy.org) will update after ComfyUI stable release.
So, if you find any core node missing in this document, it might be because the new core nodes have not yet been released in the latest stable version. Please wait for the next stable release.
## Model Download and Loading in Workflows
Since the workflows covered in this document all use the same workflow template, we can first complete the model download and loading information introduction, then enable or disable different inputs through bypassing different nodes to achieve different workflows.
The model download information is already embedded in the workflow information in specific examples, so you can also complete the model download when downloading specific example workflows.
### Model Download
**Diffusion Models**
VACE 14B diffusion model (recommended, \~32GB). Place in ComfyUI/models/diffusion\_models/
VACE 1.3B diffusion model (lighter, \~7GB). Place in ComfyUI/models/diffusion\_models/
If you have used Wan Video related workflows before, you have already downloaded the following model files.
**VAE**
Wan VAE model. Place in ComfyUI/models/vae/
**Text Encoders** (choose one version)
Full precision text encoder (higher quality, larger size). Place in ComfyUI/models/text\_encoders/
FP8 text encoder (lower VRAM usage). Place in ComfyUI/models/text\_encoders/
File save location:
```
📂 ComfyUI/
├── 📂 models/
│ ├── 📂 diffusion_models/
│ │ └─── wan2.1_vace_14B_fp16.safetensors
│ ├── 📂 text_encoders/
│ │ └─── umt5_xxl_fp8_e4m3fn_scaled.safetensors # or umt5_xxl_fp16.safetensors
│ └── 📂 vae/
│ └── wan_2.1_vae.safetensors
```
### Model Loading
Since the models used in the workflows covered in this document are consistent, the workflows are also the same, and only the nodes are bypassed to enable or disable different inputs. Please refer to the following image to ensure that the corresponding models are correctly loaded in different workflows.
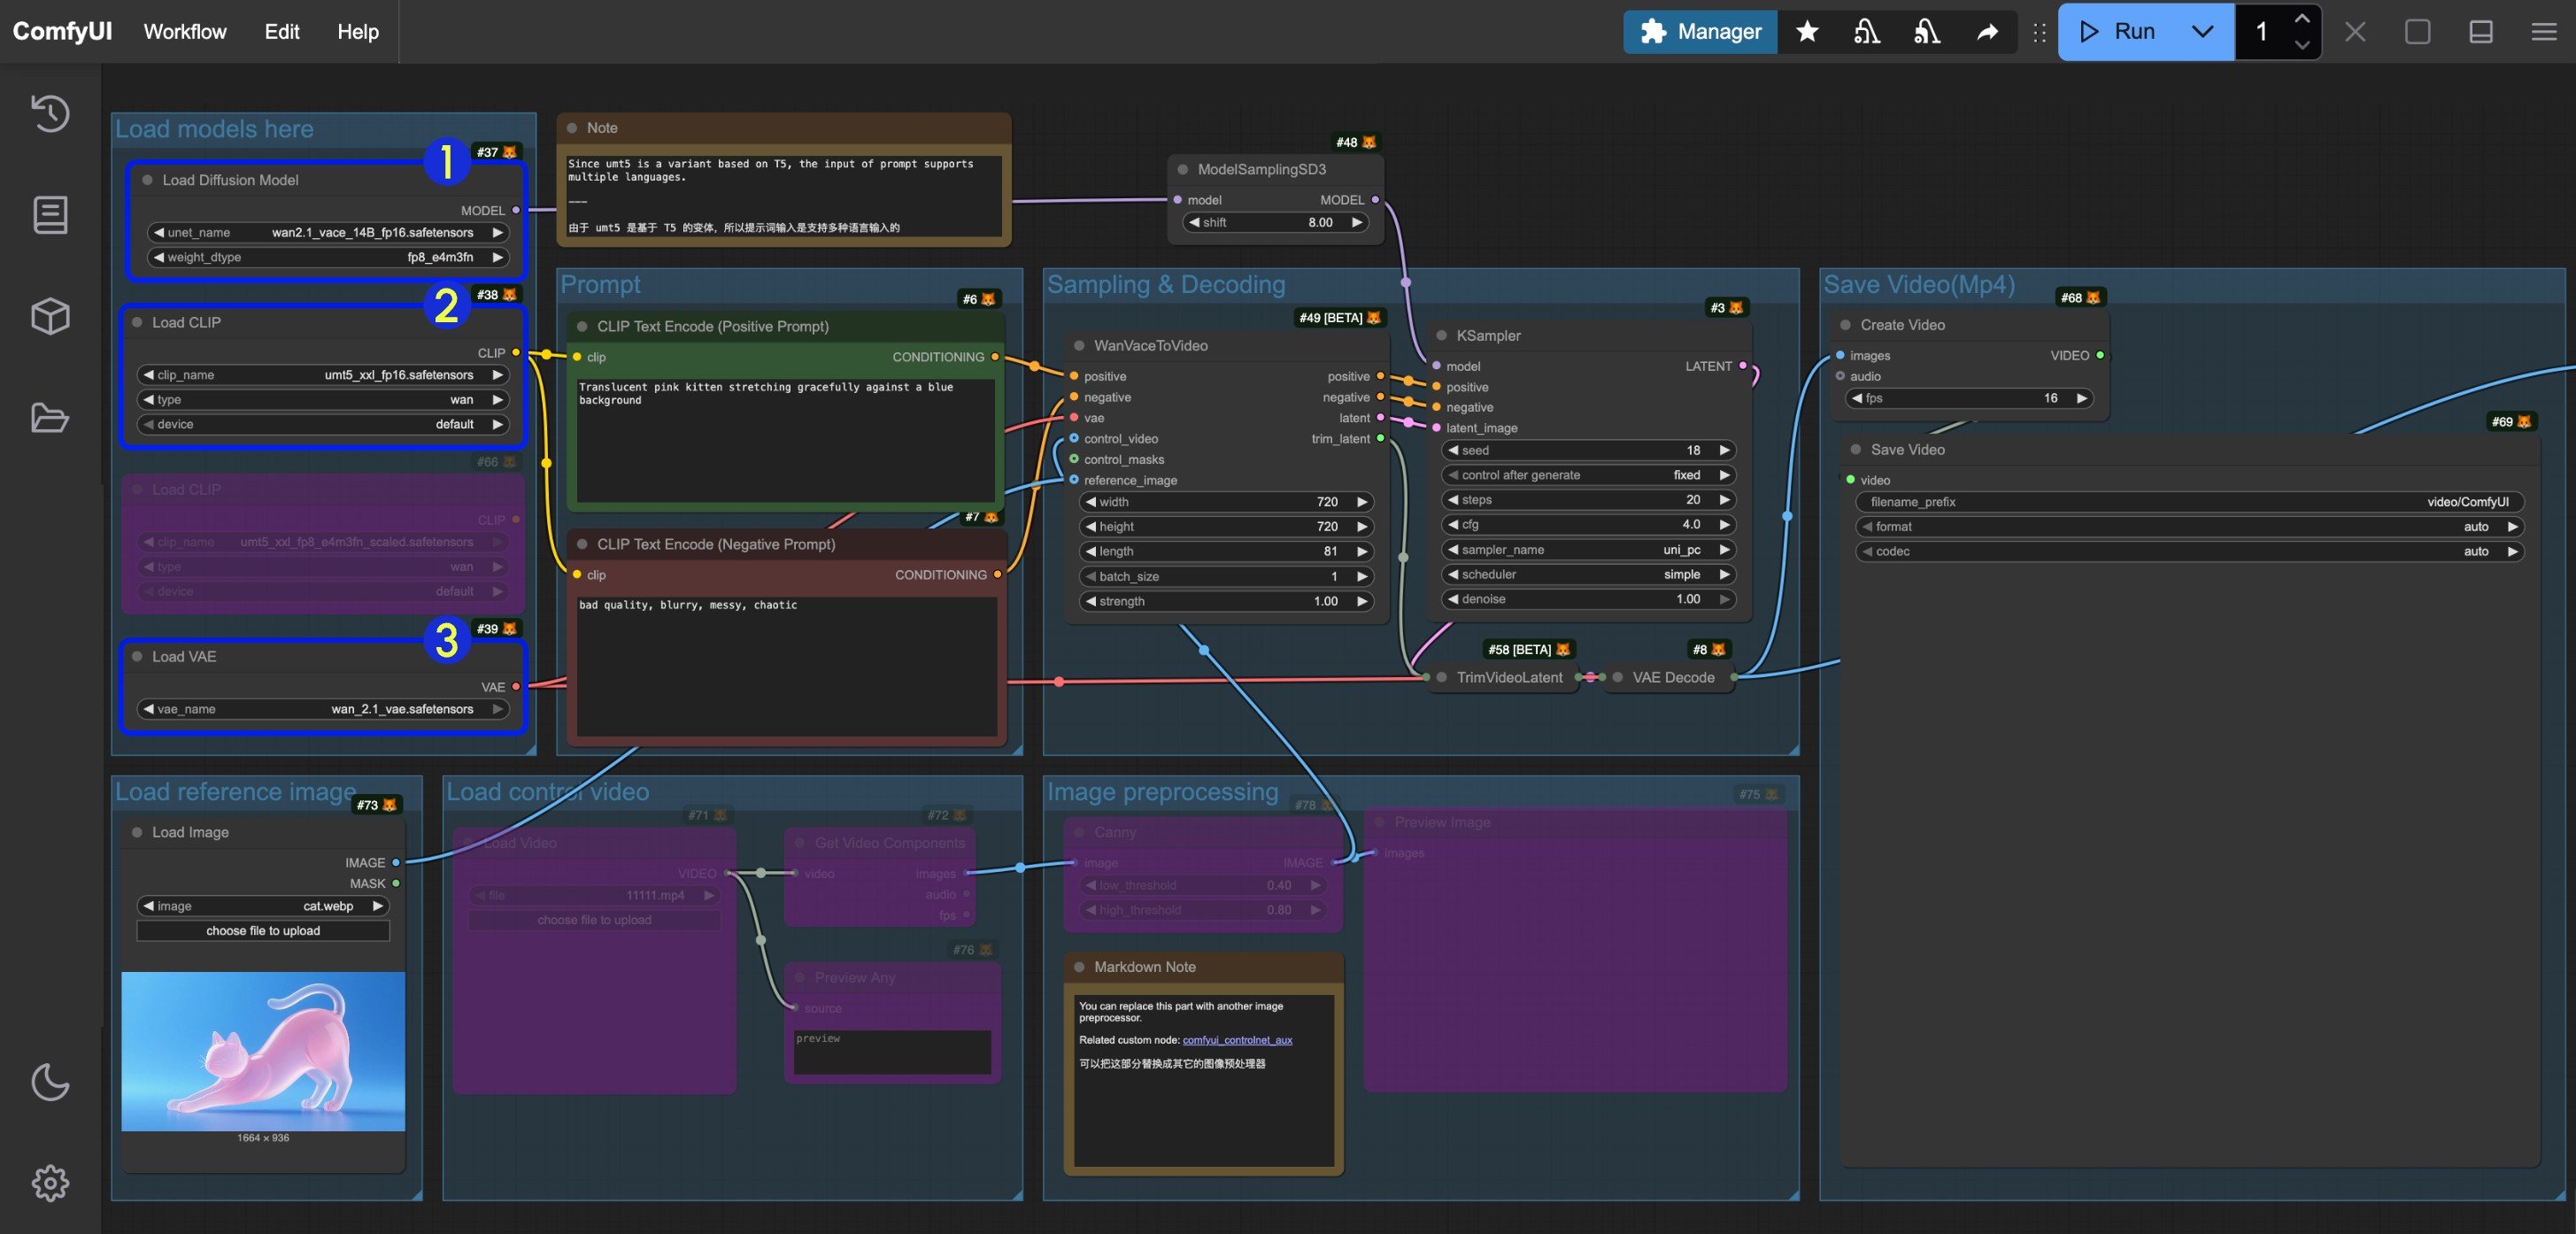 1. Make sure the `Load Diffusion Model` node has loaded `wan2.1_vace_14B_fp16.safetensors`
2. Make sure the `Load CLIP` node has loaded `umt5_xxl_fp8_e4m3fn_scaled.safetensors` or `umt5_xxl_fp16.safetensors`
3. Make sure the `Load VAE` node has loaded `wan_2.1_vae.safetensors`
### How to toggle Node Bypass Status
When a node is set to Bypass status, data passing through the node will not be affected by the node and will be output directly. We often set nodes to Bypass status when we don't need them.
Here are three ways to toggle a node's Bypass status:
1. Make sure the `Load Diffusion Model` node has loaded `wan2.1_vace_14B_fp16.safetensors`
2. Make sure the `Load CLIP` node has loaded `umt5_xxl_fp8_e4m3fn_scaled.safetensors` or `umt5_xxl_fp16.safetensors`
3. Make sure the `Load VAE` node has loaded `wan_2.1_vae.safetensors`
### How to toggle Node Bypass Status
When a node is set to Bypass status, data passing through the node will not be affected by the node and will be output directly. We often set nodes to Bypass status when we don't need them.
Here are three ways to toggle a node's Bypass status:
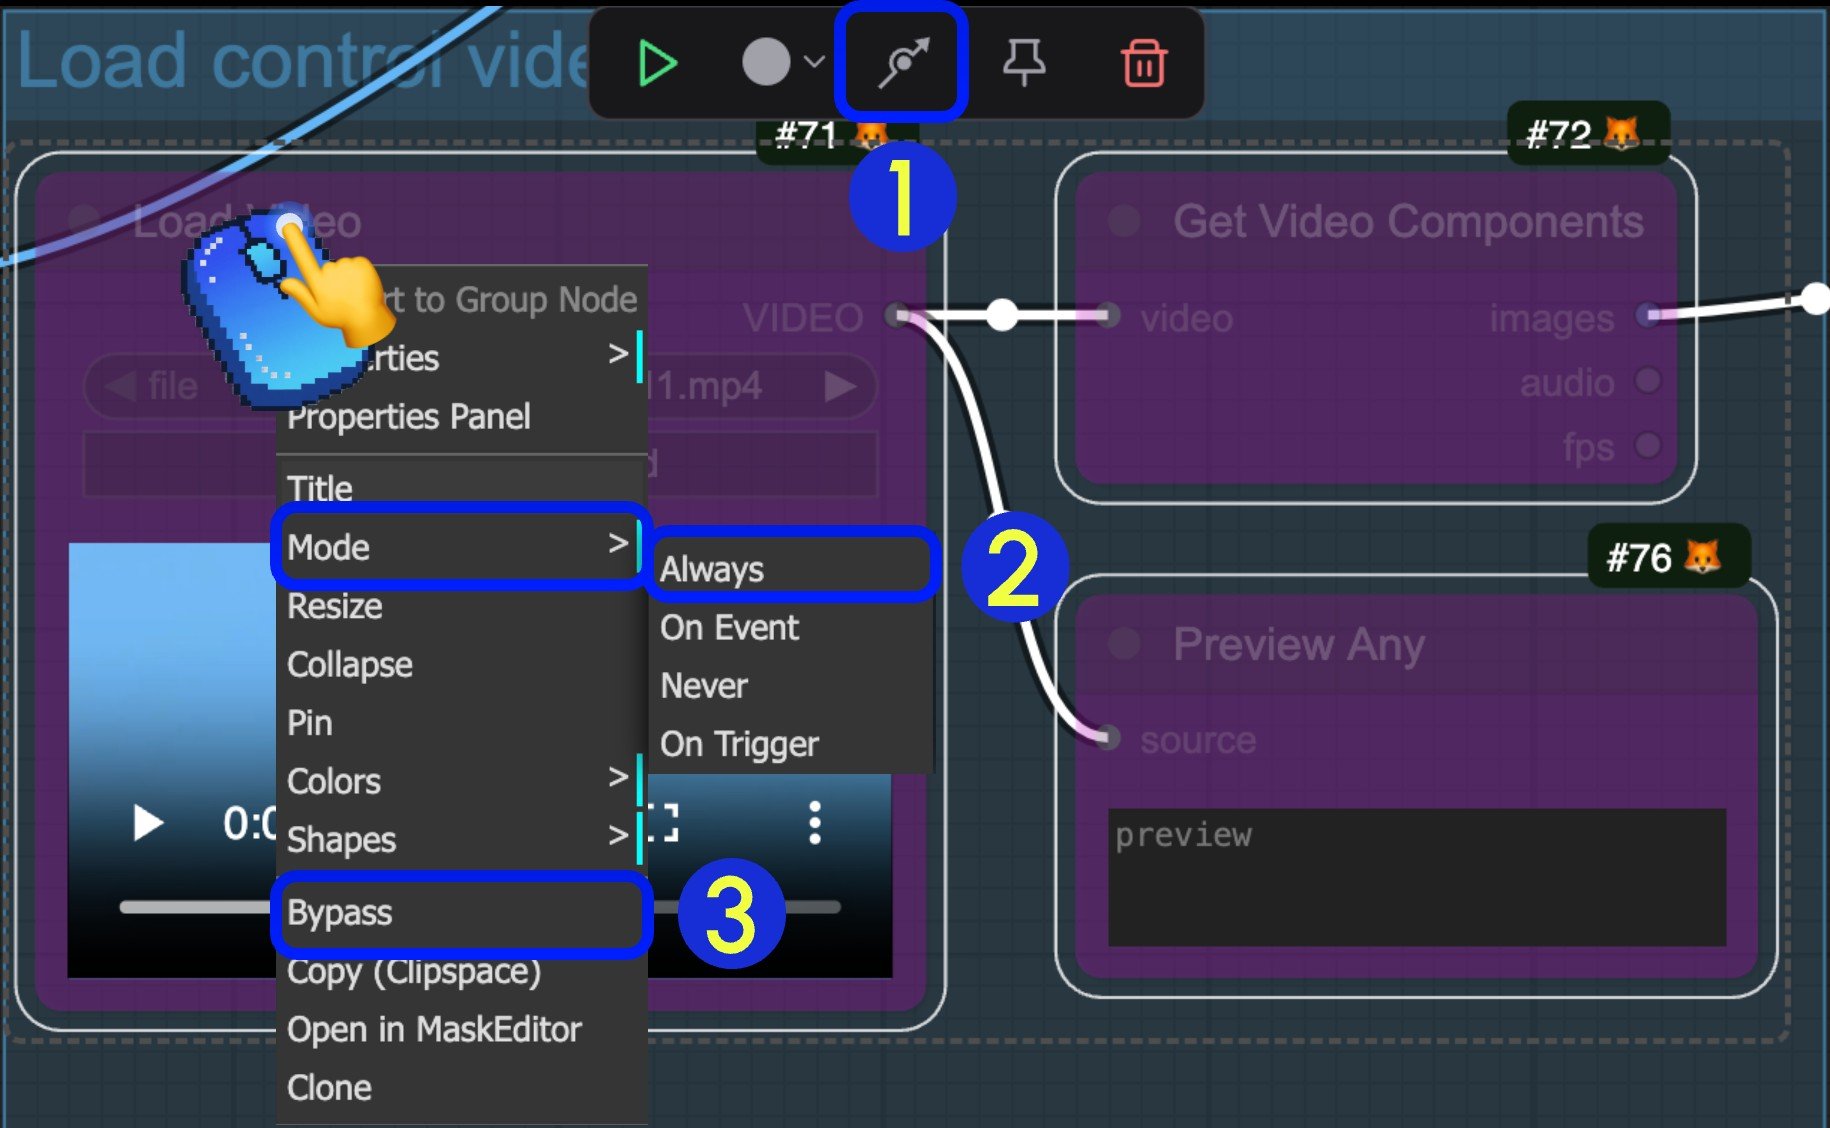 1. After selecting the node, click the arrow in the indicator section of the selection toolbox to quickly toggle the node's Bypass status
2. After selecting the node, right-click the node and select `Mode` -> `Always` to switch to Always mode
3. After selecting the node, right-click the node and select the `Bypass` option to toggle the Bypass status
***
## 1. VACE Text-to-Video
**What it does:** Transform text descriptions into high-quality videos using the Wan2.1 VACE 14B model. Supports both 480p and 720p resolution.
1. After selecting the node, click the arrow in the indicator section of the selection toolbox to quickly toggle the node's Bypass status
2. After selecting the node, right-click the node and select `Mode` -> `Always` to switch to Always mode
3. After selecting the node, right-click the node and select the `Bypass` option to toggle the Bypass status
***
## 1. VACE Text-to-Video
**What it does:** Transform text descriptions into high-quality videos using the Wan2.1 VACE 14B model. Supports both 480p and 720p resolution.
Wan2.1 VACE Text to Video
Transform text descriptions into high-quality videos. Supports both 480p and 720p with VACE-14B model.
 Open in Comfy Cloud
Download JSON or search "Wan2.1 VACE Text to Video" in Template Library
If you cannot load the workflow from mp4 file, please ensure that your ComfyUI front-end version is up to date version in [requirements.txt](https://github.com/Comfy-Org/ComfyUI/blob/master/requirements.txt), make sure you can load the workflow from mp4 file.
Currently 1.19.9 is the latest ComfyUI front-end version in the requirements.txt file.
### Steps to Run
Open in Comfy Cloud
Download JSON or search "Wan2.1 VACE Text to Video" in Template Library
If you cannot load the workflow from mp4 file, please ensure that your ComfyUI front-end version is up to date version in [requirements.txt](https://github.com/Comfy-Org/ComfyUI/blob/master/requirements.txt), make sure you can load the workflow from mp4 file.
Currently 1.19.9 is the latest ComfyUI front-end version in the requirements.txt file.
### Steps to Run
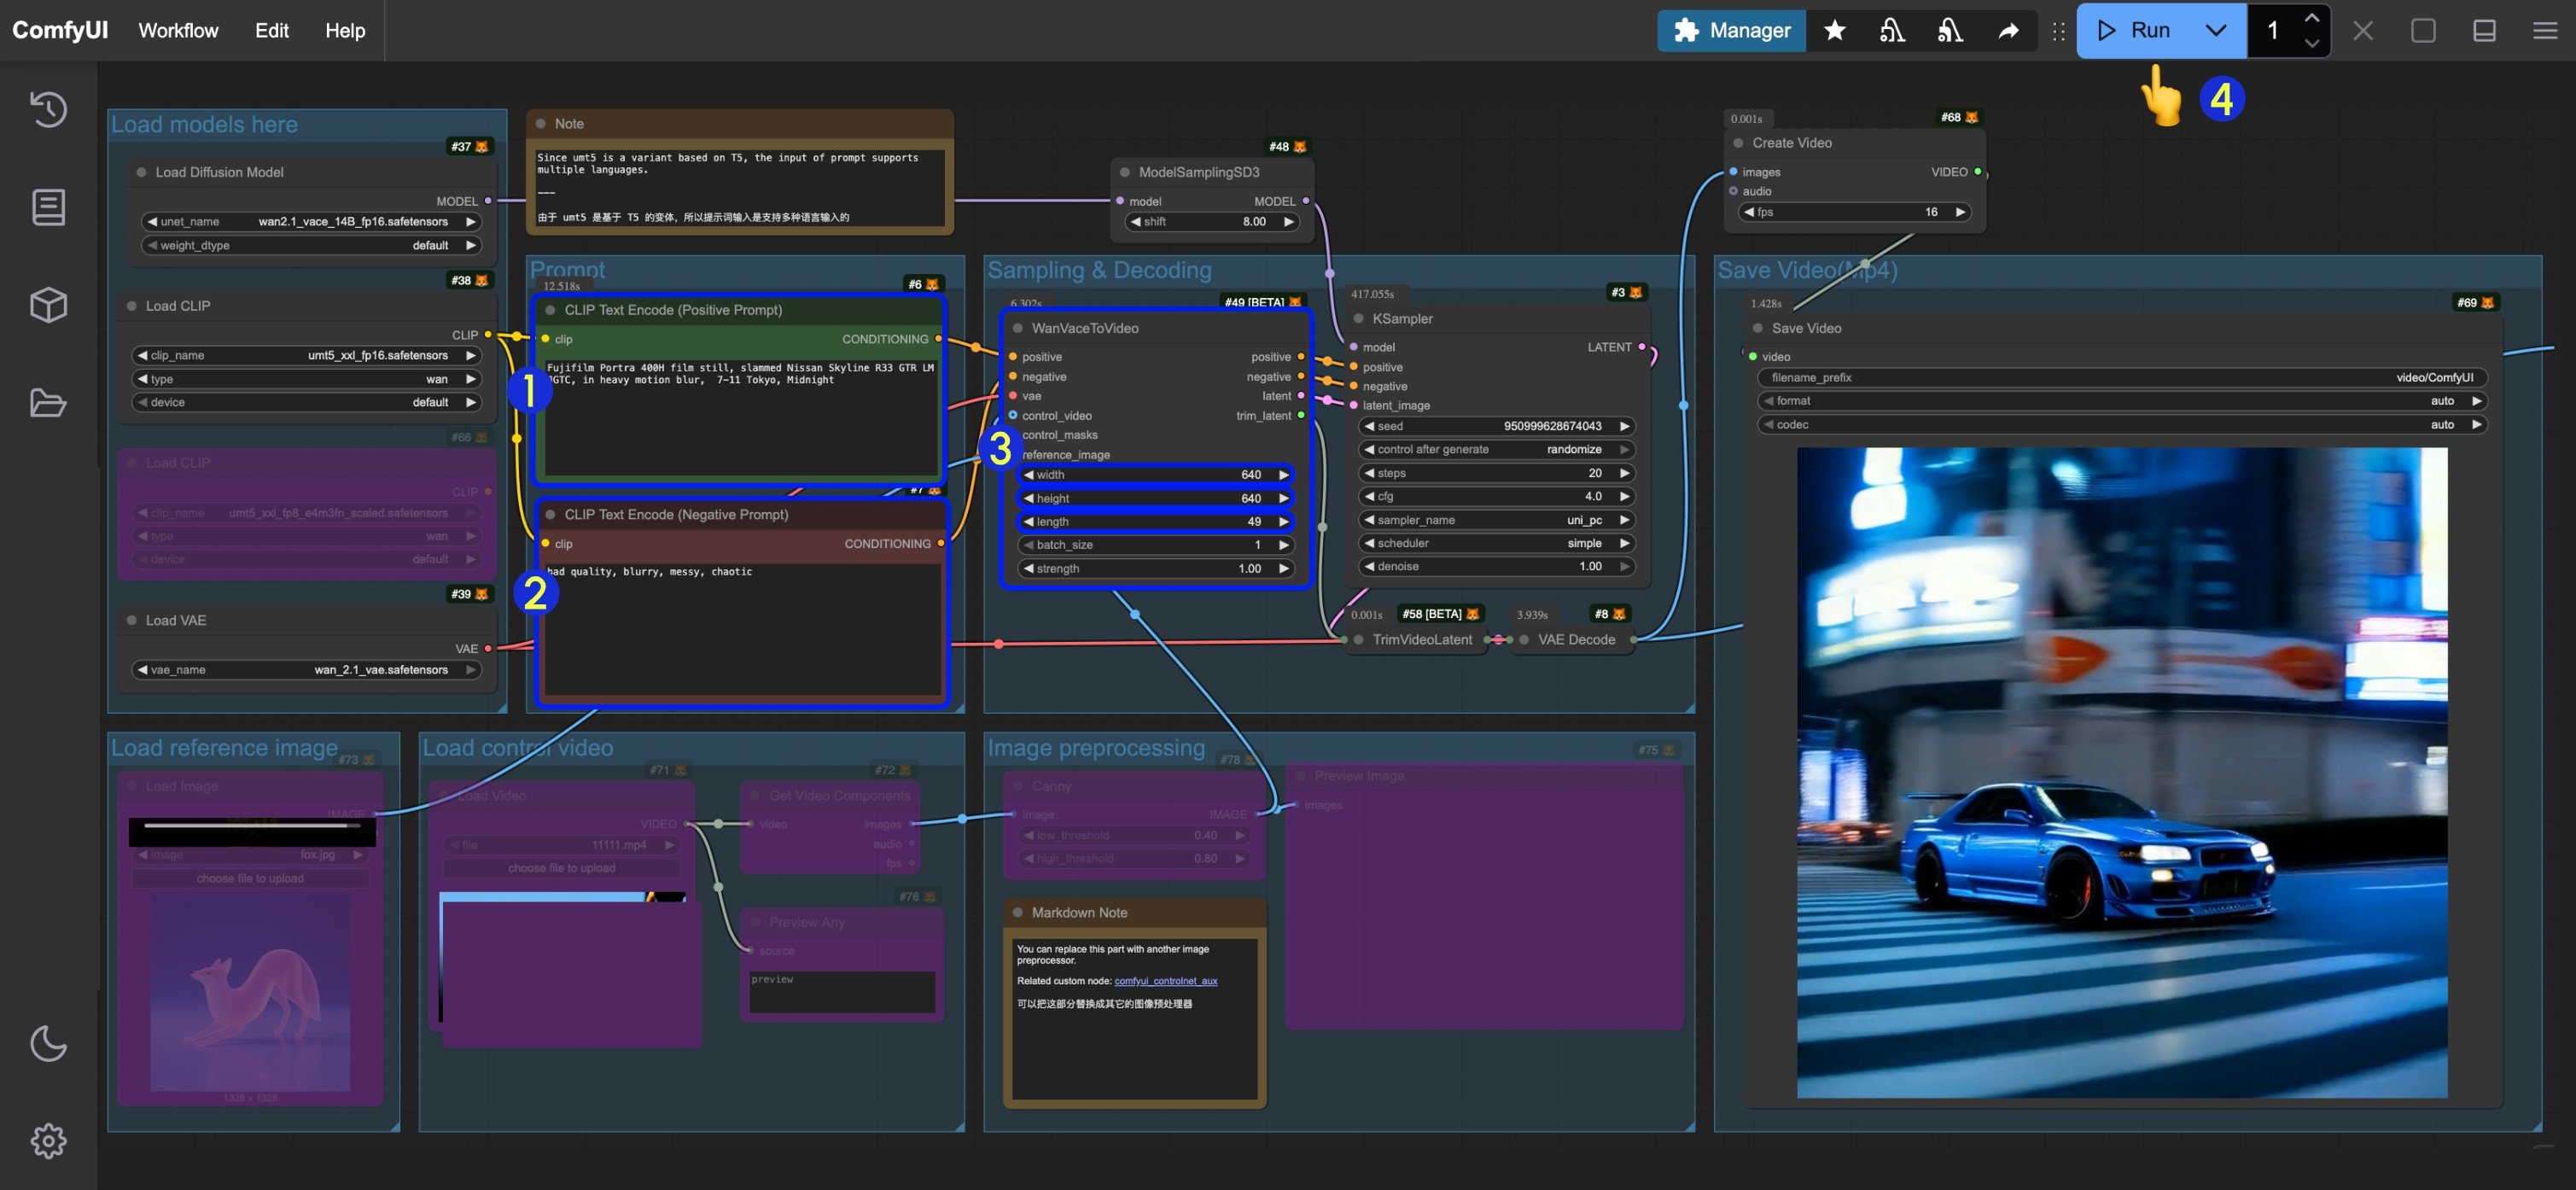 Please follow the numbered steps in the image to ensure smooth workflow execution:
1. Enter positive prompts in the `CLIP Text Encode (Positive Prompt)` node
2. Enter negative prompts in the `CLIP Text Encode (Negative Prompt)` node
3. Set the image dimensions (640x640 resolution recommended for first run) and frame count (video duration) in `WanVaceToVideo`
4. Click the `Run` button or use the shortcut `Ctrl(cmd) + Enter` to execute video generation
5. Once generated, the video will automatically save to `ComfyUI/output/video` directory (subfolder location depends on `save video` node settings)
During testing with a 4090 GPU:
* 720x1280 resolution, generating 81 frames takes about 40 minutes
* 640x640 resolution, generating 49 frames takes about 7 minutes
However, 720P video quality is better.
***
## 2. VACE Image-to-Video
**What it does:** Generate videos that match the style and content of a reference image. Perfect for style-consistent video generation.
You can continue using the workflow above, just unbypass the `Load image` node in **Load reference image** and input your image. You can also use the image below. In this file we have already set up the corresponding parameters.
Please follow the numbered steps in the image to ensure smooth workflow execution:
1. Enter positive prompts in the `CLIP Text Encode (Positive Prompt)` node
2. Enter negative prompts in the `CLIP Text Encode (Negative Prompt)` node
3. Set the image dimensions (640x640 resolution recommended for first run) and frame count (video duration) in `WanVaceToVideo`
4. Click the `Run` button or use the shortcut `Ctrl(cmd) + Enter` to execute video generation
5. Once generated, the video will automatically save to `ComfyUI/output/video` directory (subfolder location depends on `save video` node settings)
During testing with a 4090 GPU:
* 720x1280 resolution, generating 81 frames takes about 40 minutes
* 640x640 resolution, generating 49 frames takes about 7 minutes
However, 720P video quality is better.
***
## 2. VACE Image-to-Video
**What it does:** Generate videos that match the style and content of a reference image. Perfect for style-consistent video generation.
You can continue using the workflow above, just unbypass the `Load image` node in **Load reference image** and input your image. You can also use the image below. In this file we have already set up the corresponding parameters.
Wan2.1 VACE Reference to Video
Create videos that match the style and content of a reference image. Perfect for style-consistent video generation.
 Open in Comfy Cloud
Download JSON or search "Wan2.1 VACE Reference to Video" in Template Library
**Input materials**
Upload this file to the matching `LoadImage` node:
`LoadImage` node 73 · `video_wan_vace_14B_ref2v_reference_image.jpg`
### Steps to Run
Open in Comfy Cloud
Download JSON or search "Wan2.1 VACE Reference to Video" in Template Library
**Input materials**
Upload this file to the matching `LoadImage` node:
`LoadImage` node 73 · `video_wan_vace_14B_ref2v_reference_image.jpg`
### Steps to Run
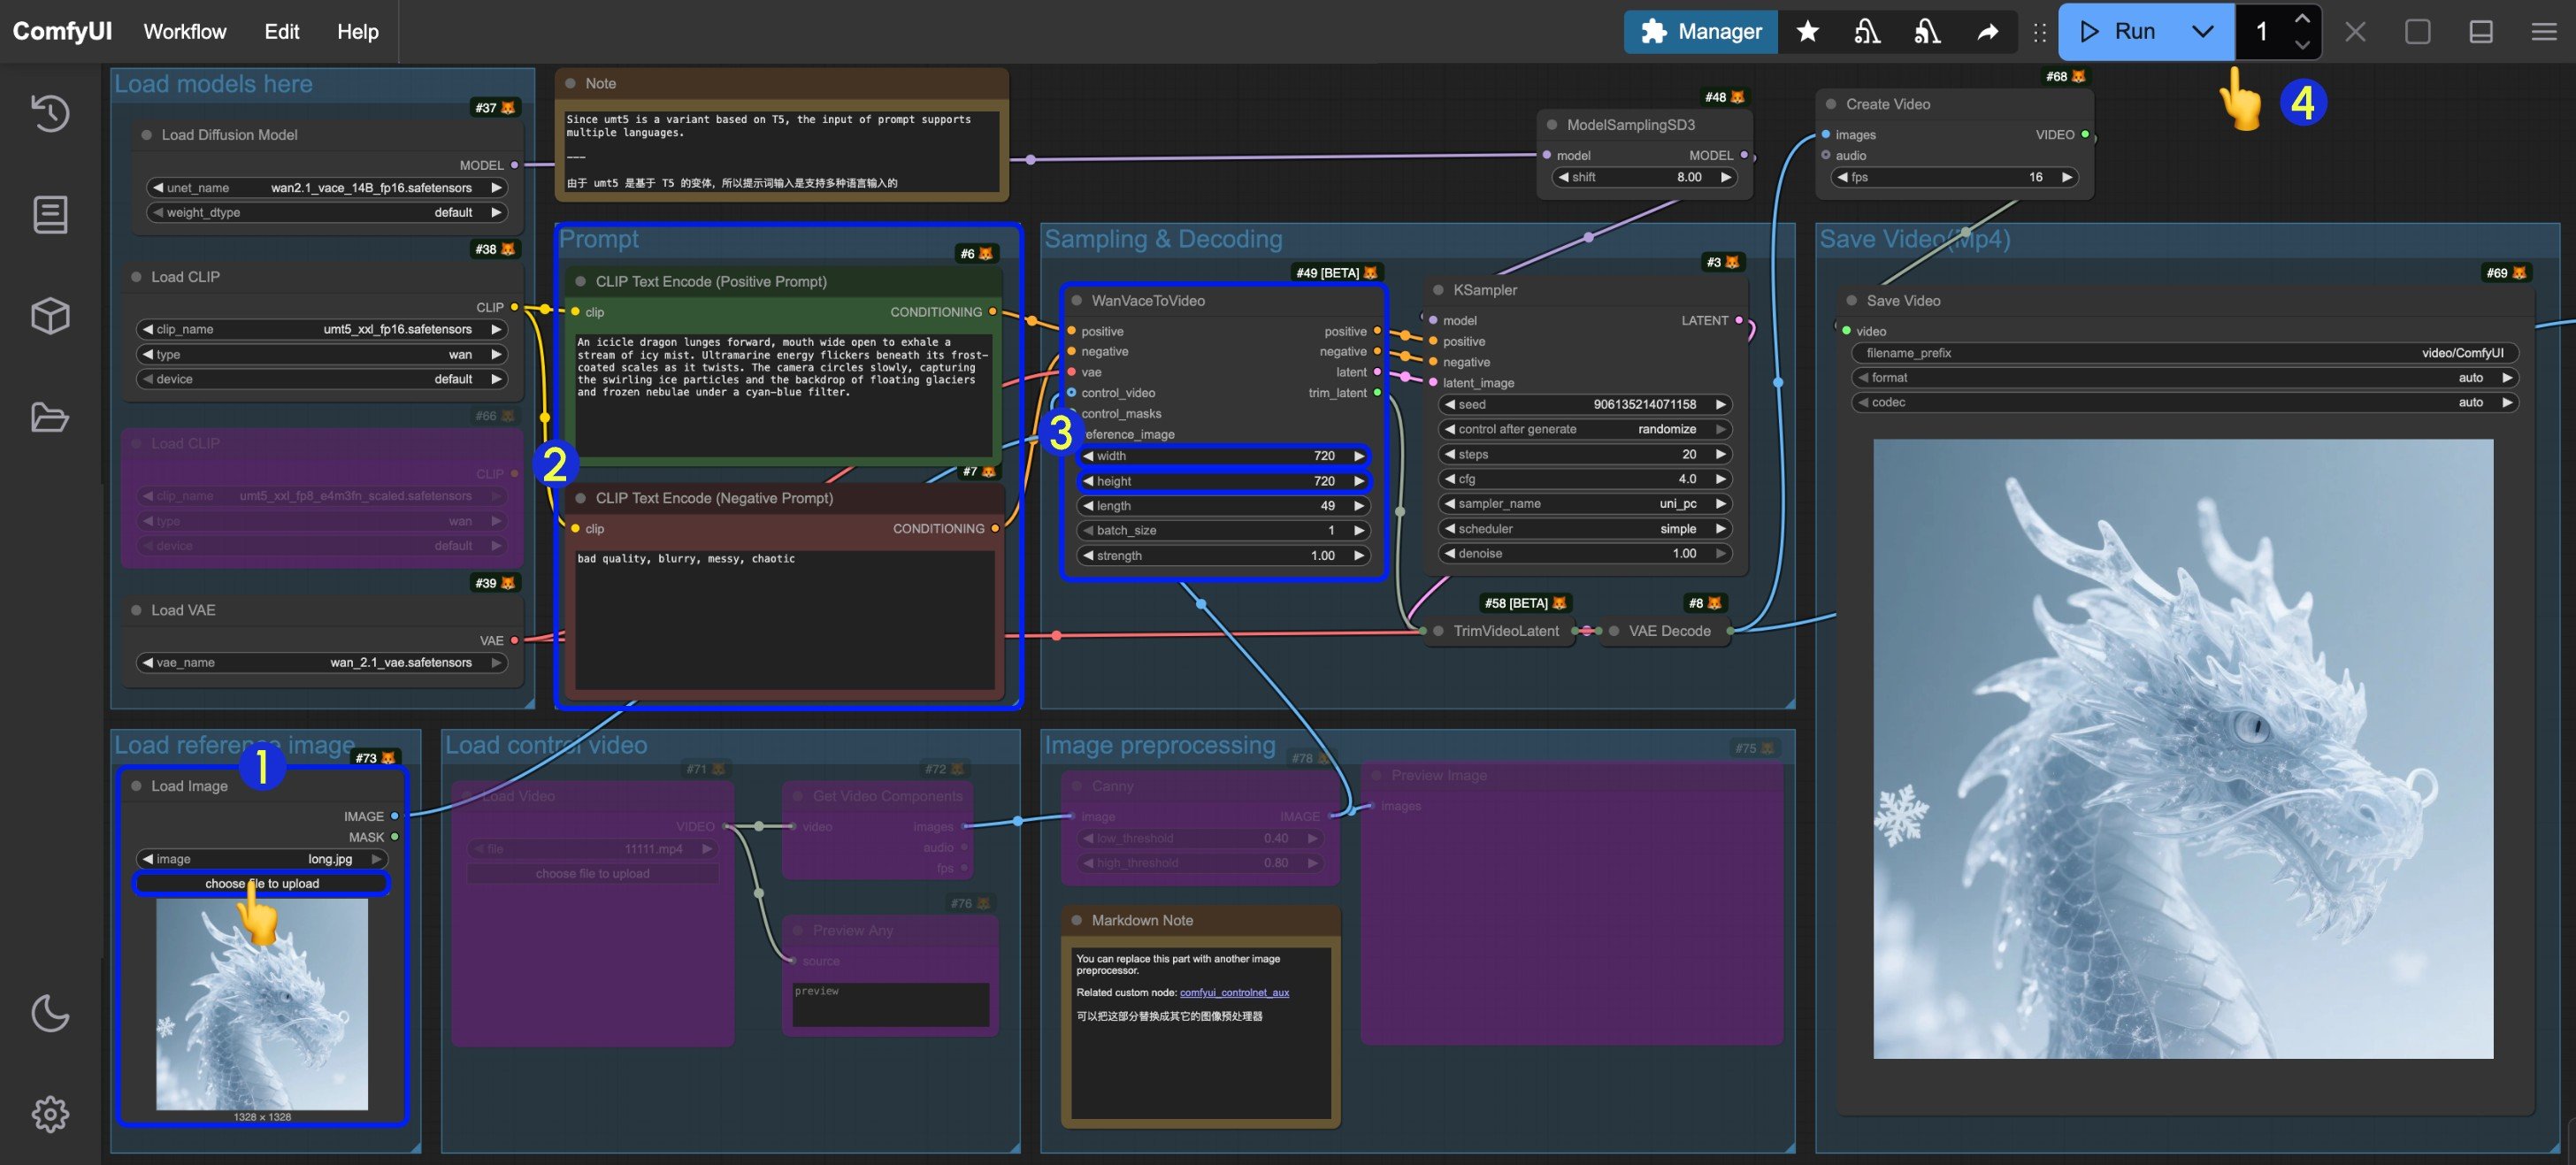 Please follow the numbered steps in the image to ensure smooth workflow execution:
1. Input the corresponding image in the `Load image` node
2. You can modify and edit prompts like in the text-to-video workflow
3. Set the image dimensions (640x640 resolution recommended for first run) and frame count (video duration) in `WanVaceToVideo`
4. Click the `Run` button or use the shortcut `Ctrl(cmd) + Enter` to execute video generation
5. Once generated, the video will automatically save to `ComfyUI/output/video` directory (subfolder location depends on `save video` node settings)
You may want to use nodes like getting image dimensions to set the resolution, but due to width and height step requirements of the corresponding nodes, you may get error messages if your image dimensions are not divisible by 16.
### Additional Notes
VACE also supports inputting multiple reference images in a single image to generate corresponding videos. You can see related examples on the VACE project [page](https://ali-vilab.github.io/VACE-Page/).
***
## 3. VACE Video-to-Video
**What it does:** Generate videos by controlling input videos and reference images using Wan VACE. Control video style and motion through reference materials.
Please follow the numbered steps in the image to ensure smooth workflow execution:
1. Input the corresponding image in the `Load image` node
2. You can modify and edit prompts like in the text-to-video workflow
3. Set the image dimensions (640x640 resolution recommended for first run) and frame count (video duration) in `WanVaceToVideo`
4. Click the `Run` button or use the shortcut `Ctrl(cmd) + Enter` to execute video generation
5. Once generated, the video will automatically save to `ComfyUI/output/video` directory (subfolder location depends on `save video` node settings)
You may want to use nodes like getting image dimensions to set the resolution, but due to width and height step requirements of the corresponding nodes, you may get error messages if your image dimensions are not divisible by 16.
### Additional Notes
VACE also supports inputting multiple reference images in a single image to generate corresponding videos. You can see related examples on the VACE project [page](https://ali-vilab.github.io/VACE-Page/).
***
## 3. VACE Video-to-Video
**What it does:** Generate videos by controlling input videos and reference images using Wan VACE. Control video style and motion through reference materials.
Wan2.1 VACE Control Video
Generate videos by controlling input videos and reference images using Wan VACE.
 Open in Comfy Cloud
Download JSON or search "Wan2.1 VACE Control Video" in Template Library
We will use the following materials as input:

Input reference image for style and content.
Preprocessed control video (depth). Use directly in
Open in Comfy Cloud
Download JSON or search "Wan2.1 VACE Control Video" in Template Library
We will use the following materials as input:
Input reference image for style and content.
Preprocessed control video (depth). Use directly in Load Video under Load control video.
1. Input image for reference:

2. The video below has been preprocessed and will be used to control video generation:
3. The video below is the original video. You can download these materials and use preprocessing nodes like [comfyui\_controlnet\_aux](https://github.com/Fannovel16/comfyui_controlnet_aux) to preprocess the images:
### Steps to Run
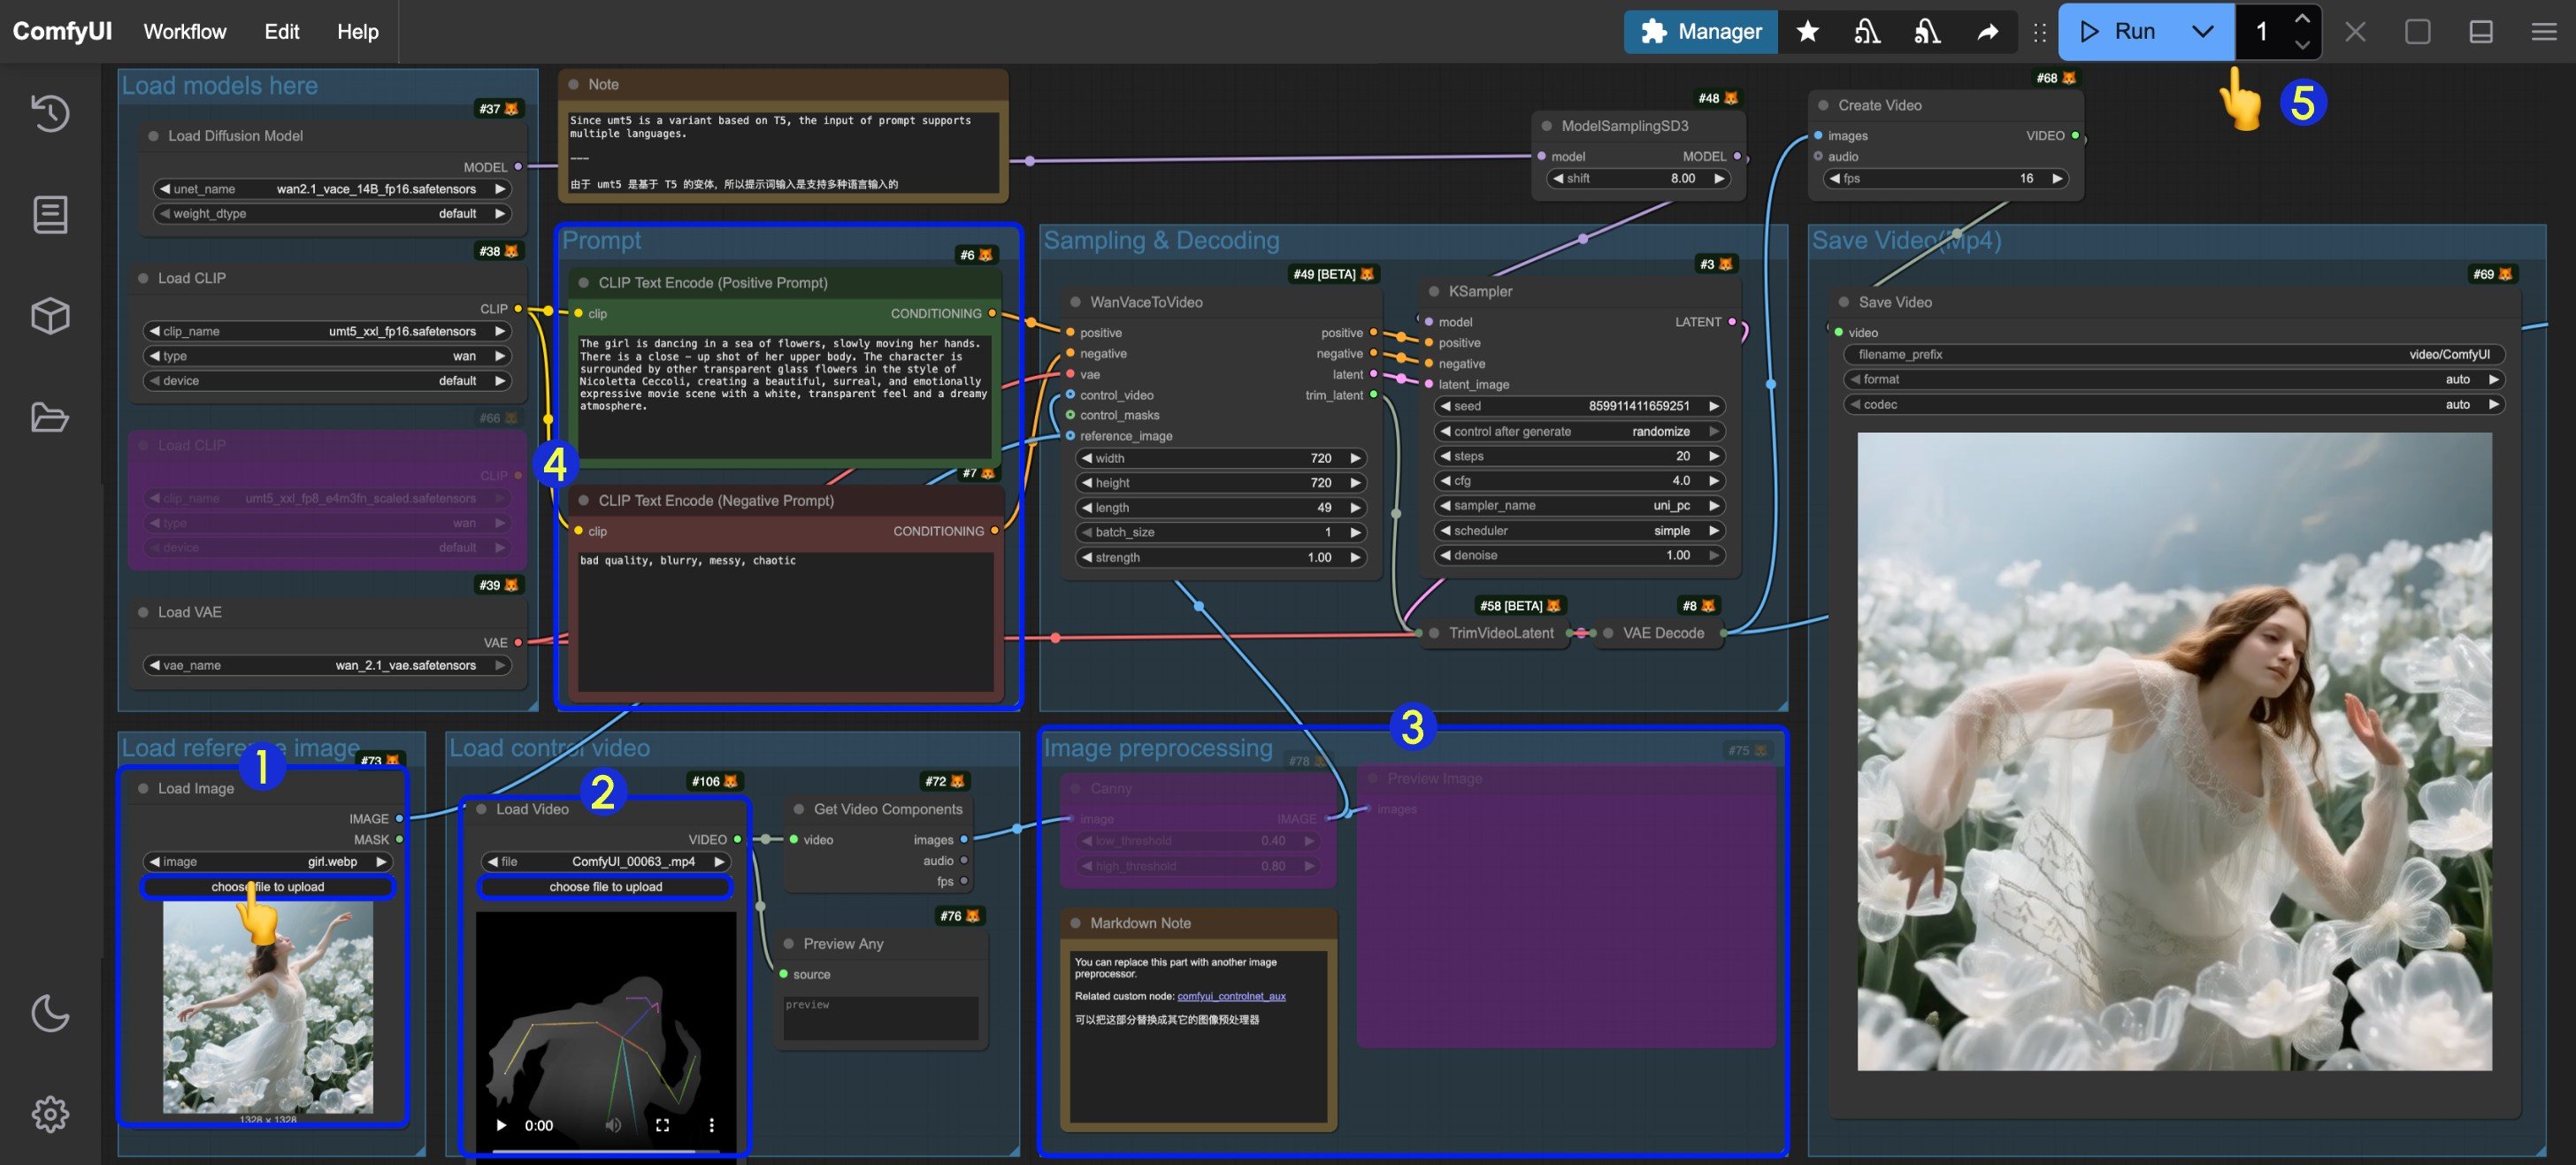 Please follow the numbered steps in the image to ensure smooth workflow execution:
1. Input the reference image in the `Load Image` node under **Load reference image**
2. Input the control video in the `Load Video` node under **Load control video**. Since the provided video is preprocessed, no additional processing is needed
3. If you need to preprocess the original video yourself, you can modify the **Image preprocessing** group or use `comfyui_controlnet_aux` nodes to complete the preprocessing
4. Modify prompts
5. Set the image dimensions (640x640 resolution recommended for first run) and frame count (video duration) in `WanVaceToVideo`
6. Click the `Run` button or use the shortcut `Ctrl(cmd) + Enter` to execute video generation
7. Once generated, the video will automatically save to `ComfyUI/output/video` directory (subfolder location depends on `save video` node settings)
***
## 4. VACE Inpainting
**What it does:** Edit specific regions in videos while preserving surrounding content. Great for object removal or replacement.
Please follow the numbered steps in the image to ensure smooth workflow execution:
1. Input the reference image in the `Load Image` node under **Load reference image**
2. Input the control video in the `Load Video` node under **Load control video**. Since the provided video is preprocessed, no additional processing is needed
3. If you need to preprocess the original video yourself, you can modify the **Image preprocessing** group or use `comfyui_controlnet_aux` nodes to complete the preprocessing
4. Modify prompts
5. Set the image dimensions (640x640 resolution recommended for first run) and frame count (video duration) in `WanVaceToVideo`
6. Click the `Run` button or use the shortcut `Ctrl(cmd) + Enter` to execute video generation
7. Once generated, the video will automatically save to `ComfyUI/output/video` directory (subfolder location depends on `save video` node settings)
***
## 4. VACE Inpainting
**What it does:** Edit specific regions in videos while preserving surrounding content. Great for object removal or replacement.
Wan2.1 VACE Inpainting
Edit specific regions in videos while preserving surrounding content. Great for object removal or replacement.
 Open in Comfy Cloud
Download JSON or search "Wan2.1 VACE Inpainting" in Template Library
**Input materials**
Input video for inpainting. Load in the
Open in Comfy Cloud
Download JSON or search "Wan2.1 VACE Inpainting" in Template Library
**Input materials**
Input video for inpainting. Load in the Load Video node.
First frame with mask overlay for inpainting region.
Reference image for inpainting content.
\[To be updated]
***
## 5. VACE Video Outpainting
**What it does:** Generate extended videos by expanding video size using Wan VACE outpainting.
Wan2.1 VACE Outpainting
Generate extended videos by expanding video size using Wan VACE outpainting.
 Open in Comfy Cloud
Download JSON or search "Wan2.1 VACE Outpainting" in Template Library
**Input materials**
Input video for outpainting. Load in the
Open in Comfy Cloud
Download JSON or search "Wan2.1 VACE Outpainting" in Template Library
**Input materials**
Input video for outpainting. Load in the Load Video node.
\[To be updated]
***
## 6. VACE First-Last Frame Video Generation
**What it does:** Generate smooth video transitions by defining start and end frames. Supports custom keyframe sequences.
Wan2.1 VACE First-Last Frame
Generate smooth video transitions by defining start and end frames. Supports custom keyframe sequences.
 Open in Comfy Cloud
Download JSON or search "Wan2.1 VACE First-Last Frame" in Template Library
**Input materials**
Starting frame image. Load in the
Open in Comfy Cloud
Download JSON or search "Wan2.1 VACE First-Last Frame" in Template Library
**Input materials**
Starting frame image. Load in the Load Image node.
Ending frame image. Load in the Load Image node.
To ensure that the first and last frames are effective, the video `length` setting must satisfy that `length-1` is divisible by 4.
The corresponding `Batch_size` setting must satisfy `Batch_size = length - 2`.
\[To be updated]